MS Outlook Versions: Microsoft Outlook has two versions, previous Outlook versions has ANSI format and support MS Outlook 2000 and 2002/XP, which have maximum file size limit of 2 GB (ANSI PST). Outlook Later Version is in Unicode format and supports Outlook version 2003 and 2007.
Possible Reason for Converting Unicode to ANSI: If you have some Outlook PST file of newer Outlook versions 2003 or 2007; but, you don’t have that version 2003 or 2007 to open that file. Now, this creates a need to degrade Unicode to ANSI. So, in place of investing in a costlier Outlook version, you can opt a cheaper way to solve your problem by getting a software to convert Outlook PST file from Unicode to ANSI which you can open in the older Outlook version (97/2000/2002) existing on your system.
Tool to Open New Outlook Version in Earlier Outlook Version: To open Outlook 2003 in earlier Outlook version you need to use some reliable third-party tool. There are several outside tools available in the online market you need to opt for some apt tool for this purpose using which you can easily open new outlook version in earlier outlook version. It is better to use some result-oriented software package for this purpose.
Open New Outlook Version in Earlier Outlook Version: One third-party tool on which you can rely is SysTools PST Upgrade software, which is easy-to-use to open earlier version PST in Outlook 2007. Using this tool you can easily and quickly solve your problem in the best possible way. With the help of this proficient tool you can open Outlook 2007 in earlier Outlook version. The tool is competent enough to open earlier version PST in Outlook 2003. Using this tool you can also open Outlook 2007 in earlier Outlook version i.e. from Unicode to ANSI PST.
source: article pool
Thursday, October 21, 2010
Friday, October 15, 2010
Steps To Recover Your Ms Office Document
There could be several situations when you might lose your Microsoft Word document while working on it. In case, your computer has encountered some error that forces the document to quit or the document has been closed by you without saving the changes, etc. This article will shed some light on the ways that will help you to recover the lost document.
Some documents are not recoverable; therefore some of the document might not be recovered following these methods.
To recover the lost file, follow these steps, as appropriate for the version of Microsoft Windows that you are running.
Method 1:
Windows Vista
If the "Always create backup copy" option has been chosen by you, you may be able to recover the backup copy of the file.
Windows Vista
Follow these steps carefully. You might not able to recover the file in case you miss any of the above mentioned steps.
Recommendations
These methods can prove to be quite helpful in recovering the lost files, but the above mentioned ways fails to recover the file. You can seek enhanced Microsoft Office help from technical firms that are easily accessible through Internet. Register yourself by subscribing to a suitable package and get all your technical issues resolved related to MS office
Some documents are not recoverable; therefore some of the document might not be recovered following these methods.
To recover the lost file, follow these steps, as appropriate for the version of Microsoft Windows that you are running.
Method 1:
Windows Vista
- Click Start, type the name of the document in the Start Search box, and then press ENTER.
- If you are able to locate the document in the file list, double-click the document to open it in Word.
- Click Start, type *.doc in the Start Search box, and then press ENTER.
- Continue to Method 2, if unable to locate the document in the file list.
- Click Start, click Search, and then go to Files or Folders.
- Type the file name in the Search for files or folders named box.
- Click My Computer, in the Look in box
- Click on Search Now, if still unable to locate the file, move to next step for all Word documents.
- To view all Microsoft Office Word 2007 document, type *.doc.
- Click Search Now. In case, you are unable to locate the file, check for it in Recycle Bin. You might locate your file in it.
If the "Always create backup copy" option has been chosen by you, you may be able to recover the backup copy of the file.
- Locate the folder in which the missing file was saved.
- Look for the files with the .wbk file name extension.
Windows Vista
- Click Start, type * .wbk in the Start Search box, and press ENTER.
- Search for the backup document in the File list and open it once located.
- Click Start, click Search, and then click For Files and Folders.
- Type *.wbk in the Search for files or folders named box.
- Click My Computer, in the Look in box.
- Click Search Now.
Follow these steps carefully. You might not able to recover the file in case you miss any of the above mentioned steps.
Recommendations
These methods can prove to be quite helpful in recovering the lost files, but the above mentioned ways fails to recover the file. You can seek enhanced Microsoft Office help from technical firms that are easily accessible through Internet. Register yourself by subscribing to a suitable package and get all your technical issues resolved related to MS office
Monday, October 11, 2010
How to Repair the 1402 Error When Installing Office?
The 1402 Office error is a problem that's caused when you try and install the Office package of applications to your computer. It's specifically caused by your computer's inability to access a certain "registry key" on your system, preventing it from being able to install the files & settings that are required.
This error will normally appear in this format:
Error 1402. Could Not Open Key
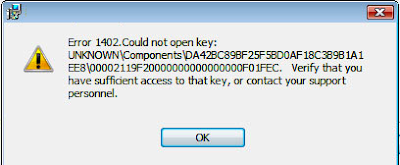
The specifics of this error are quite precise - in that it will be caused by your computer's inability to place certain settings into the registry of your system. The registry is a huge database that Windows uses to store vital files & settings for your PC, and is where everything from your desktop shortcuts to your software's options are stored. Because Microsoft Office is such a complicated program, it has many registry keys it need to insert into this database... and the 1402 shows that this cannot be done.
There are generally two reasons why the 1402 error will show - the first is that you're trying to install the Microsoft Office software onto a PC that doesn't have a registry database (versions of Windows prior to '98 don't have a registry), and the second reason is that your user account does not have the correct privileges to install programs on your system.
The way to fix this problem is to initially ensure that your computer is able to actually install a program like this - if you have Windows 98 or below, then you really need to upgrade your system before attempting to install the likes of Microsoft Office. If you have a compatible version of Windows, then you need to look at changing / updating your user profile to ensure that you have enough permission to install the programs / files / settings that you need on your PC. It's also recommended that you clean out the "registry" of your system with a registry cleaner - which should remove any potentially conflicting files / programs from your system.
Source: ezinearticles
Tuesday, September 28, 2010
How to remove IronDefender?
Here is one more malware that disguises itself as the useful malware removal tool. It's function is almost same as that of the other disguised malwares. It does not scan your computer or find any virus or malware. When IronDefender is installed in a computer it will start along with windows on the next booting. It will perform a fake scan and informs the user that a harmful malware is present in his computer and it has to be removed. It asks the user to register IronDefender by paying a price for registration. Actually the message is a lie to make the poor victim to pay for the malware.
IronDefender will display options that other genuine antivirus as- "Full Scan", "System Scan", "Scan Basic Locations", "Scan Removable Media", "Scan Folder", "Realtime protection" and "Tools". All of the features do not really protect the computer but just show the fake functions only.
If you are a victim of the IronDefender, ir has to be removed immediately !
Removal:
Kill the process
F0E84.exe
vur4.exe
[random].exe
Delete the registry
HKEY_CURRENT_USER\Software\IronDefender
HKEY_LOCAL_MACHINE\SOFTWARE\IronDefender
HKEY_LOCAL_MACHINE\SOFTWARE\Microsoft\Windows\CurrentVersion\Uninstall\IronDefender
HKEY_CURRENT_USER\Software "Install_Dir" = "C:\Program Files\FDFCA"
HKEY_CURRENT_USER\Software\Microsoft\Windows\CurrentVersion\Run "vur4.exe"
HKEY_LOCAL_MACHINE\SOFTWARE\Microsoft\Windows\CurrentVersion\Run "F0E84.exe"
Delete the files and folders
%ALLUSERSPROFILE%\Start Menu\Programs\IronDefender.lnk
%ProgramFiles%\FDFCA\
%ProgramFiles%\FDFCA\F0E84.exe
%ProgramFiles%\FDFCA\Uninstall.exe
%SystemRoot%\[random].exe
%SystemRoot%\[random].bin
%SystemRoot%\[random].dll
%SystemRoot%\[random].cpl
%SystemRoot%\system32\[random].exe
%SystemRoot%\system32\[random].bin
%SystemRoot%\system32\[random].dll
%SystemRoot%\system32\[random].cpl
%UserProfile%\Desktop\hash
%UserProfile%\Desktop\IronDefender.lnk
%UserProfile%\Local Settings\Temp\[random].exe
Sunday, September 19, 2010
Error 1935 and 0x80070005 during Office 2010 Installation
Fixing Office 2010 Error 1935 and Error 0x80070005

This is typically permission or sharing based error and may relate to the Office version which is already on the computer (in the case of an Office 2010 upgrade). Other errors that we've seen during upgrades from Microsoft Office 2007 are: error 1309, error 1335, error 1706, error 1923, error 1935 and error 2908.
To fix the error, make sure that you have closed down all instances of any Microsoft Office application that is running on your system, these may include any of the following:
• Word
• Excel
• Access
• PowerPoint
• Outlook
• Communicator
In addition to the above, we have had reports that some Anti-virus programs interfere with the installation, temporarily disable your Anti-Virus programs, install Office 2010 and then re-enable the AV solution. Programs we've seen having problems with Office 2010 installation:
• Forefront Client Security
• Panda Cloud Antivirus
• Clam Antivirus
Also check the task manager to see if you have any background Office tasks running. If so, shut them down. Retry your installation again.
If you experience the same error once again, try restarting your computer and once rebooted, retry your installation.
After closing all applicaitons and running the installer, everything should run smoothly and you will be presented with the following dialog:

Monday, September 6, 2010
Fix Error 2203 During Office 2010 Setup
Overview: How to avoid and fix the "Error 2203. An Internal Error Occurred" when installing Office 2010? Here's the way to fix it. The error occurred when users trying to install OneNote to the Office 2010 as it happened in office 2007 before. Though Office 2010 has been newly added new features last month, when installing Office 2010 not everything goes well. If you meet the Error 2203. An Internal Error Occurred during Office 2010 setup, you can fix it now.
Software you’ll need :
* Microsoft Office 2010
* OneNote 2010
Here is how to fix an Internal Error 2203 appears during Office 2010 setup.

Scroll down to Windows Installer and right click to open a window, select the Stop option to stop the services.

Restart it by choosing Start and close the Services window.


It will pop up the "Permissions for Temp" window. Click the Add button.

Now type Everyone in the Objects Names box and click Check Names to underline it then click OK.

Back to "Permissions for Temp " window you can see Everyone there. Under "Permissions for Everyone" box, check the Full control option and click OK.

Software you’ll need :
* Microsoft Office 2010
* OneNote 2010
Here is how to fix an Internal Error 2203 appears during Office 2010 setup.
Step 1. Reset the Services
Go to Services by typing services.msc in the Search box in the Start Menu and hit Enter key.Scroll down to Windows Installer and right click to open a window, select the Stop option to stop the services.
Restart it by choosing Start and close the Services window.
Step 2. Select Properties in Temp Folder
Go to the Temp folder by searching %temp% in the Search box in the Start Menu and hit Enter. Select Properties in the open Temp folder. Step 3. Set up Temp Properties
In will bring you the Temp Properties Window. Click on the Security tab and click on Edit button under the "Group or user names" box, you can change the permissions. It will pop up the "Permissions for Temp" window. Click the Add button.
Now type Everyone in the Objects Names box and click Check Names to underline it then click OK.
Back to "Permissions for Temp " window you can see Everyone there. Under "Permissions for Everyone" box, check the Full control option and click OK.
Step 4. Finish the Fix and Go on Office 2010 Setup
You can go on Office 2010 setup without error. OneNote will be installed as one of your Microsoft Office 2010 suites.
Friday, September 3, 2010
Disable Add-ins in Outlook 2010
Here is a guide to disable add-ins in Outlook 2010. In your Outlook 2010, it must have some add-ins that you don't often use, which may let your Outlook 2010 slow down. It is necessary to disable that add-ins. This tutorial will teach you how to disable Add-ins in Outlook 2010. All the steps are so easy that you won't make any mistakes. Just follow the simple steps, and your Outlook 2010 will run smoother.
1. Click "File" tab, and choose "Options". The "Options" window will be opened up, and click "Add-Ins" from left sidebar.

2. Select the type of add-ins you want to disable from "Manage" dropdown box at the bottom of the windows. Click "Go" to open a dialog.

3. In the dialog you can uncheck any add-ins to disable them.

4. Click "OK" to save the setting.
You have already finished the work to disable add-ins in Outlook 2010. Remember to restart Outlook 2010 to make all the changes happened.
1. Click "File" tab, and choose "Options". The "Options" window will be opened up, and click "Add-Ins" from left sidebar.
2. Select the type of add-ins you want to disable from "Manage" dropdown box at the bottom of the windows. Click "Go" to open a dialog.
3. In the dialog you can uncheck any add-ins to disable them.
4. Click "OK" to save the setting.
You have already finished the work to disable add-ins in Outlook 2010. Remember to restart Outlook 2010 to make all the changes happened.
Sunday, August 22, 2010
Office 2010 vs Office 2007
Office 2010 vs Office 2007 Comparison Chart
| Feature Set | Office 2010 | Office 2007 |
|---|---|---|
| Ribbon UI: For easy access to all the utility features of the applications | Suitewide availability. (Word, Excel, PowerPoint, Outlook, OneNote, Visio...) | Only available in Word, Excel and PowerPoint |
| Office Web Apps: Online usage of Office applications. | Included | Not available |
| Outlook features: Email conversations, conversation management, Multiple Exchange accounts, 'Quick Steps', Social Connector to integrate Social Networking, Improved IMAP support | Included | Not available |
| Word features: Backstage view, Image background removal, Instant screenshots, collaborative document editing, Art effects in Word Art, more Artistic Effects | Included | Not available |
| Excel features: Backstage view, Instant Data visualization through 'Sparklines', Online collaboration, Slicers, Macro recording support for chart elements | Included | Not available |
| PowerPoint features: Backstage view, Photo editing, video editing, advanced transition effects, web based collaboration | Included | Not available |
| OneNote features: Backstage view, Fluent UI, Research and note-taking improvements, Enhanced Information access | Included | Not available |
| 'Protected View' feature to help mitigate malicious files & exploits to your computer | Included | Not available |
| Integration of Office suite with web services such as SkyDrive, Hotmail, etc through Office Web Apps | Included | Not available |
Tuesday, August 17, 2010
Crypt32.dll Is Incompatible
This Post provides further information about Microsoft office Support to fix Crypt32.dll Error. Crypt32.dll is incompatible with Microsoft Office Outlook after upgrading to Outlook2007 . The file Crypt32.dll is incompatible with Microsoft Office Outlook.
Resolution
After upgrading to Office 2007 and attempting to open Outlook, You may receive an error stating the 'CRYPT32.dll is incompatible with MS Outlook. Install again.'
Note Re-installing will not help
Follow these steps to resolve the issue
Open c:\program files\Microsoft Office\Office 12\
Locate outlook.exe
Right click on Outlook.exe and click on properties
Click on Compatibility tab
Uncheck the box run in compatibilty mode
Click OK
Restart Outlook.
Monday, August 9, 2010
How to Customize Toolbar in Office 2010

Customizing Office 2010 programs is easier than with version 2007. Office 2010 fixed many of the disliked quirks of the 2007 release. Flexibility and capability on the Quick Access Toolbar allows users to place frequently used commands and macros and reduce reliance on the Ribbon. Customizing the toolbar is the same for each Office 2010 program.
Step 1
Right-click on the Quick Access Toolbar and select "Customize Quick Access Toolbar..." As an alternative, click on the "File" tab, select "Options" and click on "Quick Access Toolbar." Either approach opens a window with two columns of choices. The left column is access to virtually all commands available in each of the Office programs. The right column is the content of the Toolbar.
Step 2
Access the list of commands from the left column using the "Choose Commands from..." drop-down box at the top of the column. Choose from the command groups or select "All Commands" or "Macros."
Step 3
Click on the commands desired for the Toolbar one at a time. Click the "Add" button located between the columns to move the command onto the Toolbar. Repeat for each command to be added. At the top of each command group is the . This is the vertical line used to separate groups of commands on the Quick Access Toolbar. In Office 2003 and earlier, the separator was accessed by selecting "Create a group." Now it acts like an independent command.
Step 4
Organize the commands into logical groupings. Move commands up or down by highlighting the command in the right column and using the "Move Up" or "Move Down" buttons on the right to position the commands. The Toolbar window is organized so the command at the top is leftmost on the tool bar, and each command below it is located to the right of the top command.
Step 5
Save the customization choosing to "Export" the Toolbar to a folder. This allows the same Quick Access Toolbar to be imported into any Office program and also serves as a backup file. Click "OK" to close the window and
Source:- Ehow.com
Wednesday, July 28, 2010
Keyboard Shortcuts For Office 2010
Navigation | |
| Switch to Mail | CTRL+1 |
| Switch to Calendar | CTRL+2 |
| Switch to Contacts | CTRL+3 |
| Switch to Tasks | CTRL+4 |
| Switch to Notes | CTRL+5 |
| Switch to Folder List in Navigation Pane | CTRL+6 |
| Switch to next message (with msg open) | CTRL+PERIOD |
| Switch to previous message (with msg ) | CTRL+COMMA |
| Go to a different folder | CTRL+Y |
| | |
| ||||||||||||||||||||||
| ||||||||||||||||||||||||||
| ||||||||||||||||||||||||||
| ||||||||||||||||||||||||||||
| ||||||||
| |
| ||||||||
| |
| Tasks | |
| Show or hide the To-Do Bar | ALT+F2 |
| Accept a task request | ALT+C |
| Decline a task request | ALT+D |
Subscribe to:
Posts (Atom)