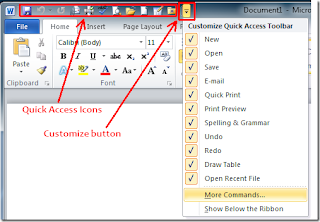
Customizing Office 2010 programs is easier than with version 2007. Office 2010 fixed many of the disliked quirks of the 2007 release. Flexibility and capability on the Quick Access Toolbar allows users to place frequently used commands and macros and reduce reliance on the Ribbon. Customizing the toolbar is the same for each Office 2010 program.
Step 1
Right-click on the Quick Access Toolbar and select "Customize Quick Access Toolbar..." As an alternative, click on the "File" tab, select "Options" and click on "Quick Access Toolbar." Either approach opens a window with two columns of choices. The left column is access to virtually all commands available in each of the Office programs. The right column is the content of the Toolbar.
Step 2
Access the list of commands from the left column using the "Choose Commands from..." drop-down box at the top of the column. Choose from the command groups or select "All Commands" or "Macros."
Step 3
Click on the commands desired for the Toolbar one at a time. Click the "Add" button located between the columns to move the command onto the Toolbar. Repeat for each command to be added. At the top of each command group is the . This is the vertical line used to separate groups of commands on the Quick Access Toolbar. In Office 2003 and earlier, the separator was accessed by selecting "Create a group." Now it acts like an independent command.
Step 4
Organize the commands into logical groupings. Move commands up or down by highlighting the command in the right column and using the "Move Up" or "Move Down" buttons on the right to position the commands. The Toolbar window is organized so the command at the top is leftmost on the tool bar, and each command below it is located to the right of the top command.
Step 5
Save the customization choosing to "Export" the Toolbar to a folder. This allows the same Quick Access Toolbar to be imported into any Office program and also serves as a backup file. Click "OK" to close the window and
Source:- Ehow.com
No comments:
Post a Comment